How to Host a Zoom Webinar on Marvelous
Hosting a webinar on Zoom can be a process full of many moving pieces. Some of the more tedious tasks include: scheduling the event in Zoom, scheduling reminder emails with the correct zoom link before the event, trouble-shooting on your own, and going back into zoom post-event to download and share the replay.
Are you searching for a more automated process? If you answered yes, Marvelous created a solution just for you!
This article will show you how to seamlessly run a Zoom Webinar on Marvelous without the tedious tasks mentioned above—giving you more time to focus on teaching, coaching, and sharing your knowledge.
First things first, let’s talk about prerequisites.
While we have built-in live streaming on the Marvelous teaching platform, this article is specifically about integrating Zoom. To use Zoom on Marvelous, you need to have a paid Zoom account.
To run a class or session where you can see your students and they can see you, the Pro Plan is right for you. If you’re looking to run a class or webinar where your attendees see you, but you don’t see them and have a space for polling and Q&A, you’ll need to look at a Zoom plan that includes those features.
Once you have a Zoom account set up, head into your Marvelous studio and link the accounts, here is a help document that explains how to do that.
Let’s run a webinar on Marvelous.
Now that we have integration out of the way, this is where you’ll see just how straightforward hosting a webinar can be!
You can either watch the video below or follow the step-by-step instructions listed in this blog:
Setting up a Zoom webinar on Marvelous:
To begin, go to your Marvelous Dashboard.
Click “Calendar” and then “+Add Event.”
This screen is where you will add all the details and choose the “Broadcast Event” Type.
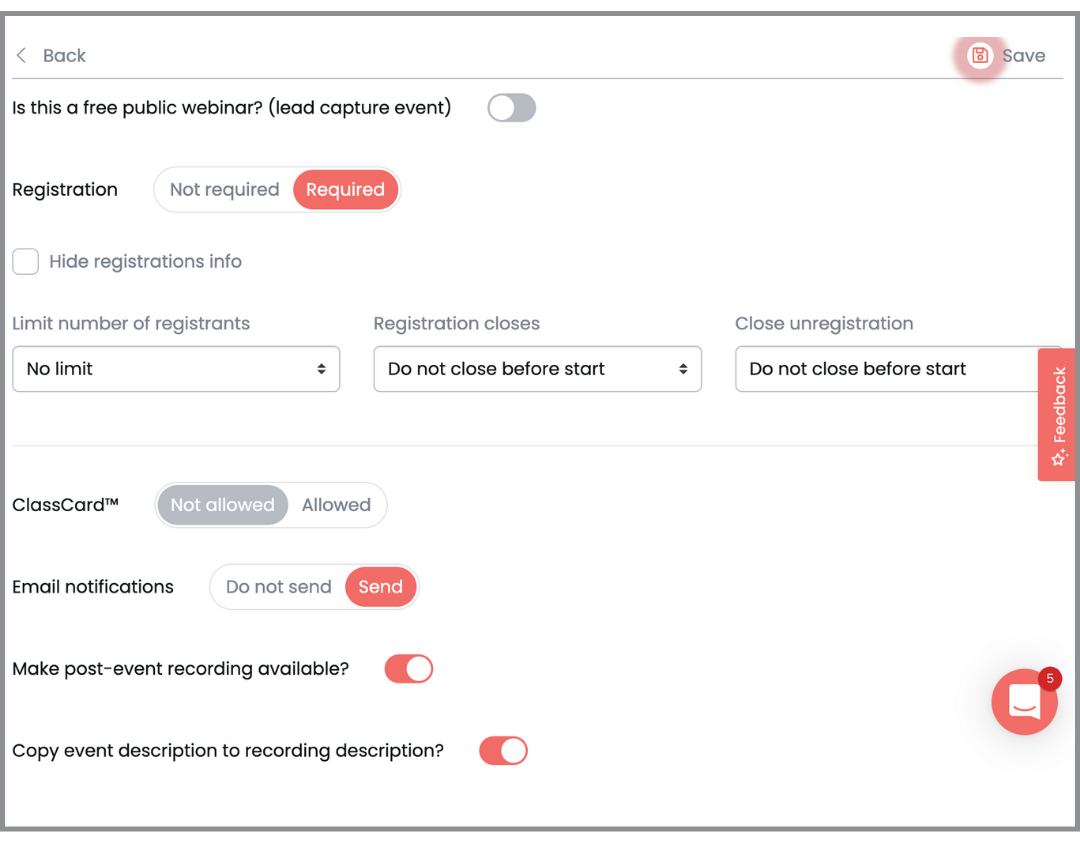
Select the appropriate options at the bottom of the screen.
If you run your webinar as a lead capturing event, switch this toggle to “Yes”. (This means the event is free for anyone to join, as long as they provide their email address. Perfect for growing your mailing list!)
If you’re running the event as part of your membership or course, keep this toggle set to “No.” (Typically, you will require registration.)
Here, you can also limit the number of people who can register and set a closing time to register and unregister your event. Leaving these on their default settings means that registration is required but does not limit the number of people joining or registering.
Email reminders and in-app notifications are automatically switched on. Attendees will receive two reminders: one at 1-hour before the event start time and another 30-minutes before the event. (These include a direct link to the event page!)
If you’re hosting your webinar as part of a membership or course, you can display the recording or replay on the event page itself. This is available on the page for 72 hours. (Don’t worry, the recording of your event also saves to your Media Library.)
And finally, if you decide to include a description of your webinar, it will be automatically transferred to the description of the recording.
Next, you will share your webinar!
Once all the logistics are complete, it’s time to share your webinar with the world!
The event page is where your current clients or students can join the webinar. If you’re hosting a free public webinar to capture leads, the event page looks like the picture below and includes a place for people to input their email addresses.
Sharing your webinar is easy! You simply copy the URL in the address bar and include it as a hyperlink in your emails or on your Marvelous Bio single link landing page to share this specific event.
Now it’s time to manage and start your webinar.
Let’s begin with managing your webinar:
To manage your event, head to your calendar and select your event.
Once the event is selected, a pop-up will appear with an overview of the event details. Click on “Manage,” and a list of attendees will appear.
Here you can add and delete attendees and export them as a CSV file.
If you need to edit the details of your event, simply click “Edit” in the top right-hand corner.
It’s event day, so what’s next?
Head to your Marvelous calendar and click on the event - this is where the pop-up event details will appear.
When you’re ready to begin the Zoom webinar, click “Start Zoom Webinar”– this will open up the Zoom Webinar application.
From the student side, they simply click the “Join Livestream event” button on the event page, which opens up the Zoom application.
When your event ends, click “End” in Zoom and “Stop Zoom Webinar” on your Marvelous calendar.
Once you’ve celebrated your successful webinar, find your replay and add it to your product.
After the recording is processed, it will appear in your Media Library. So there is no need to go into Zoom, download your recording, and then upload it into Marvelous.
If you have a membership that you’d like to add the webinar recording to, simply open the recording and click “Add to product,” and find the product you want to add it to. If you’re adding the recording to a course, open your course, go to “Lessons”, and add the webinar to the relevant lesson. Talk about an smooth transition!
And there you have it: How to simply and efficiently run a Zoom webinar on Marvelous.
Hosting a webinar requires organization and more behind-the-scene setup than most realize. That’s why our Marvelous integration with Zoom has been a breath of fresh air for so many of our clients.
The tedious tasks that would have taken up a large portion of your time are automated, leaving you to focus on what’s really important, teaching and coaching.
Scheduling your webinar on Marvelous can provide you with the Zoom webinar attendance report, give you the option to display the recording on the event page post-webinar, automatically transfer the description of the webinar to the recording, send to automated reminder emails to sign-ups, and save the replay to your media library without having to go back into your Zoom application.
Next time you want to host a webinar, Marvelous is here to help! Watch our Demo below.


